18. Maintenance and Developer Guide
18.1. Source files
The cis source code is hosted at https://github.com/cedadev/jasmin_cis.git, while the conda recipes and other files are hosted here: https://github.com/cistools.
18.2. Test suites
The unit tests suite can be ran using Nose readily. Just go the root of the repository (i.e. cis) and type
nosetests cis/test/unit and this will run the full suite of tests.
A comprehensive set of integration tests are also provided. There is a folder full of test data
at: /group_workspaces/jasmin/cis/cis_repo_test_files which has been compressed and is available as a tar inside that
folder.
To add files to the folder simply copy them in then delete the old tar file and create a new one with:
tar --dereference -zcvf cis_repo_test_files.tar.gz .
Ignore warning about file changing - it is because the tar file is in the directory. Having the tar file in the
directory, however, means the archive can be easily unpacked, without creating an intermediate folder.
To make the integration tests run this needs to be copied to the local machine and decompressed. Then set the
environment variable CIS_DATA_HOME to the location of the data sets, and run nosetests cis/test/integration.
There are also a number of plot tests available under the test/plot_tests directory in
the test_plotting.py script. These integration tests use matplotlib to perform a byte-wise comparision of the output
against reference plots, using a pre-defined tolerance. Any tests which fail can be evaluated using the idiff.py
tool in the same directory. Running this will present a graphical interface showing the reference plot, the test output,
and the difference between them. You can either choose to accept the difference which will move the test output to the
reference directory, or reject it.
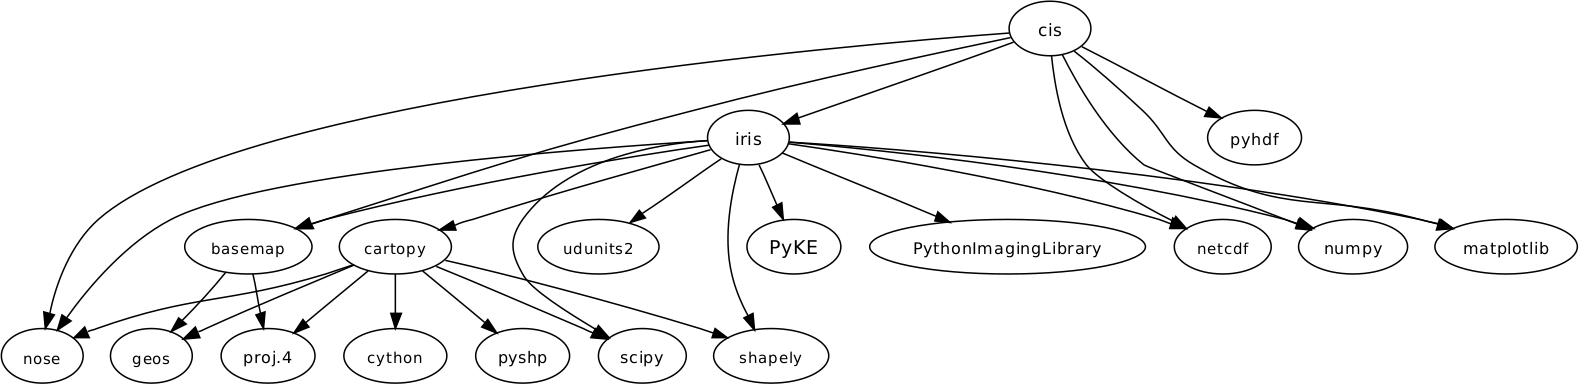
18.3. Dependencies
A graph representing the dependency tree can be found at doc/cis_dependency.dot (use XDot to read it)
18.4. Creating a Release
To carry out intermediate releases follow this procedure:
- Check the version number and status is updated in the CIS source code (cis/__init__.py)
- Tag the new version on Github with new version number and release notes.
- Create a tarball - use
python setup.py egg_info sdistin the cis root dir. - Install this onto the release virtual environment: this is at
/group_workspaces/jasmin/cis/cis_dev_venv. So activate the venv, upload the tarball somewhere on the GWS and then dopip install <LOCATION_OF_TARBALL>. - Create an anaconda build on each platform (OS X, Linux and Windows) - see below.
- Request Phil Kershaw upload the tarball to PyPi. (Optional)
For a release onto JASMIN, complete the steps above and then ask Alan Iwi to produce an RPM, deploy it on a test VM, confirm functionality then rollout across full JAP and LOTUS nodes.
18.4.1. Anaconda Build
The Anaconda build recipes for CIS and the dependencies which can’t be found either in the core channel, or in SciTools are stored in their own github repository here. To build a new CIS package clone the conda-recipes repository and then run the following command:
$ conda build -c cistools -c scitools cis
By default this will run the full unit-test suite before successful completion. You can also optionally run the integration test suite by specifying the CIS_DATA_HOME environment variable.
To upload the package to the cistools channel on Anaconda.org use:
$ binstar upload <package_location> -u cistools
Alternatively, when creating release candidates you may wish to upload the package to the ‘beta’ channel. This gives an opportunity to test the packaging and installation process on a number of machines. To do so, use:
$ binstar upload <package_location> -u cistools --channel beta
To install cis from the beta channel use:
$ conda install -c https://conda.binstar.org/cistools/channel/beta -c cistools -c scitools cis
18.5. Documentation
The documentation and API reference are both generated using a mixture of markdown and autogenerated documentation using the Sphinx autodoc package. Build the documentation using:
python setup.py build_sphinx
This will output the documentation in html under the directory doc/_build/html.
18.6. Continuous Integration Server
JASMIN provide a Jenkins CI Server on which the CIS unit and integration tests are run whenever origin/master is updated.
The integration tests take approximately 7 hours to run whilst the unit tests take about 5s. The Jenkins server is
hosted on jasmin-sci1-dev at /var/lib/jenkins and is accessed at http://jasmin-sci1-dev.ceda.ac.uk:8080/
We also have a Travis cloud instance (https://travis-ci.org/cedadev/cis) which in principle allows us to build and test on both Linux and OS X. There are unit test builds currently working but because of a hard time limit on builds (120 minutes) the integration tests don’t currently run.
18.6.1. Copying files to the CI server
The contents of the test folder will not be automatically copied across to the Jenkins directory, so if you add any
files to the folder you’ll need to manually copy them to the Jenkins directory or the integration tests will fail. The
directory is /var/lib/jenkins/workspace/CIS Integration Tests/cis/test/test_files/. This is not entirely simple
because:
- We don’t have write permissions on the test folder
- Jenkins doesn’t have read permissions for the CIS group_workspace
In order to copy files across we have done the following:
- Copy the files we want to /tmp
- Open up the CIS Integration Tests webpage and click ‘Configure’
- Scroll down to ‘Build’ where the shell script to be executed is found and insert a line to copy the file to the
directory, e.g.
cp /tmp/file.nc /var/lib/jenkins/workspace/CIS Integration Tests/cis/test/test_files - Run the CIS Integration Tests
- Remove the line from the build script
- Remove the files from /tmp
18.6.2. Problems with Jenkins
Sometimes the Jenkins server experiences problems which make it unusable. One particular issue we’ve encountered more than once is that Jenkins occasionally loses all its stylesheets and then becomes impossible to use. Asking CEDA support (or Phil Kershaw) to restart Jenkins should solve this.